FAQs
Preliminaries
PDF (Portable Document Format) is the most common and preferred file format for submitting digital documents. With the installation of a PDF print driver on your computer, virtually any program can generate a PDF file suitable for printing. Both commercial and free PDF print drivers are available online for download from different sources.
Although PDF files are recommonded, we do accept .TIFF, high resolution .JPG, .AI, .PSD, .PNG, & .EPS files too.
In printing terms, a proof is a one-off copy of your document after all modifications and printing setup processes have been completed. It is your last and best opportunity to make sure that the print job comes out the way you want. By carefully inspecting the proof, you can help us assure an accurate, flawless delivery of your print job on the first run.
Please note, that approving the proof is also you agreeing to the terms and conditions of the final product. Any mistakes or changes that you do not point out in the proof, will not be In The Mix's responsibility.
In short, printers and monitors produce colors in different ways. Monitors use the RGB (red, green, blue) color model, which usually supports a wider spectrum of colors. Printers use the CMYK (cyan, magenta, yellow, black) color model, which can reproduce most—but not all—of the colors in the RGB color model. Depending on the equipment used, CMYK generally matches 85–90% of the colors in the RGB model. When a color is selected from the RGB model that is out of the range of the CMYK model, the application chooses what it thinks is the closest color that will match. Programs like Adobe Photoshop will allow you to choose which color will be replaced. Others may not.
Make sure it's set at 300 dpi (do this prior to creating the art), set the file to CMYK mode, use bleeds and margins, outline/embed any and all fonts you use!
In printing, the term "bleed" refers to the area of a printed piece that extends beyond the edge of the finished page. This is done to ensure that any images or colors that run off the edge of the page will still be visible after the piece is cut down to its final size. For example, if a design contains a full-page background image that goes all the way to the edge of the page, it would be set up with a bleed to ensure that no white borders appear after the final trimming. This is a common practice in printing industry to avoid any misalignment or white borders around the image in the final product.
CMYK and RGB are two different color models used in printing and digital media.CMYK stands for Cyan, Magenta, Yellow, and Key (black) and is a subtractive color model used in printing. The colors are mixed together to create various shades, and the colors are absorbed by the paper, resulting in the final printed image.RGB stands for Red, Green, and Blue and is an additive color model used in digital media such as computer monitors and televisions. The colors are combined to create various shades and the colors are emitted by the screen, resulting in the final image.In general, CMYK is used for printing and RGB for digital display. This is because the color gamut (the range of colors) of CMYK is smaller than RGB, and some colors that can be displayed on a screen can't be reproduced in print, because the inks that are used in printing are limited. So, when you design something that will be printed it's good practice to convert it to CMYK, and if it's going to be displayed on a screen, it's good to keep it in RGB.
If you send us an RGB file, there is a chance that a color shift may occur and you may not be satisfied with your job.
THESE COLORS ARE IN RGB
THESE ARE THE SAME COLORS BUT IN CMYK
You should always start and finish your designs in CMYK color mode.
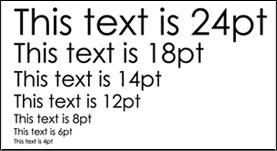
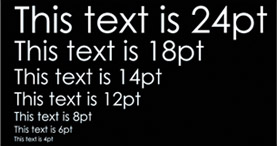
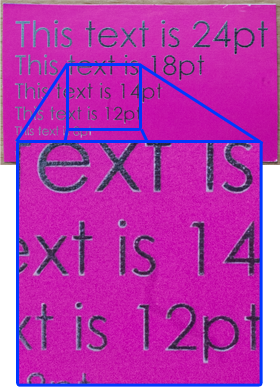
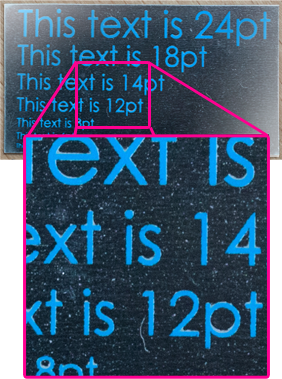
Low resolution files may be printed as is or will be placed on hold until we receive new files, slowing your turn-around.
THESE ARE 72 DPI LOW RES IMAGES
THESE ARE THE SAME IMAGES BUT AT 300 DPI
Yes, but if the border is too close to the cutline, it may be cut off-center slightly.

Any transparency issue can be resolved before saving your file.
What a transparency problem looks like on screen... | After a transparency problem is printed... |

To prevent this, never use shadows, glows, or any other transparency (image or otherwise) on top of a spot color. Always convert your spot color to CMYK and flatten before sending.
- SHADOWS
- GLOWS
- TRANSPARENCY

Primarily used to intentionally overlap inks for a number of reasons, overprint can cause unexpected results. We suggest that you turn all overprint objects off before submitting your files.
- ON SCREEN VIEW
- AFTER PRINTING

In this case the logo was set to overprint. The colors from logo are mixing with the colors from the background. Unexpected results may occur if you have accidentally set certain objects to overprint. Always check logos and other artwork before submitting.
No. We are now specifically set up to process one side at a time, and this requires that each side of a job must be on a separate file.
- 2 FILES – 1FR, 1BK
- 1 FILE – FR&BK

What is rich black and how can I get it?
Rich black is an ink mixture of solid black, 100% K, with additional CMY ink values. This results in a darker tone than black ink alone. If you print black alone as 100% K, the resulting black may not be as dark as you might like.
100% K ON SCREEN
100% K AFTER PRINT
We recommend using
C 60 M 40 Y 40 K 100
This will give you a deep, dark, rich black.
*Products that are printed with dye-sublimation (9oz Premium Polyester Banner, Flags, Table Covers, Fabric Tube Displays, etc.)
call for the following color values:
C 100 M 100 Y 100 K 100
Cracking of the edges of a business card sometimes occurs when the card contains high values of ink, as in dark colors.
CLOSE UP OF BUSINESS CARD
This usually happens on a small amount of cards in the run. To prevent this, use lighter colors or if you must use dark colors, use as little ink as possible.
Many things can cause banding. Banding can be caused by the program that it is exported from, such as Indesign or Corel. Also, too many gradient steps, for example going from a very light color to a dark color, in a small area will cause banding.
CLOSE UP OF BANDING
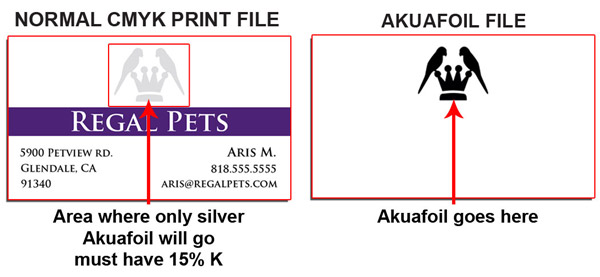
What is Sparkling Akuafoil and how do I set it up?
With Akuafoil, you can turn a wide range of CMYK colors into multi-colored foils. Akuafoil uses a special processed foil system that is applied under a 4/c process to create an array of foil colors. It's simple, affordable, and makes your prints stand out from the crowd.
For an Akuafoil job, you must include an Akuafoil mask file along with your CMYK file. The mask file indicates where the Akuafoil will be applied. The file setup is the same as Spot UV. Use 100% K where Akuafoil needs to be applied and white where the Akuafoil is not applied.
As shown above, the file on the left is the normal CMYK print file. If you want the logo to be Akuafoil, then your Akuafoil mask file should look like the file on the right. The white indicates no Akuafoil and black 100% K indicates where the Akuafoil will be applied. When uploading, please remember to upload separate files.
Here are some more things to keep in mind when creating your Akuafoil artwork:
Make sure the mask and CMYK print file are aligned. They should match exactly in size and position.
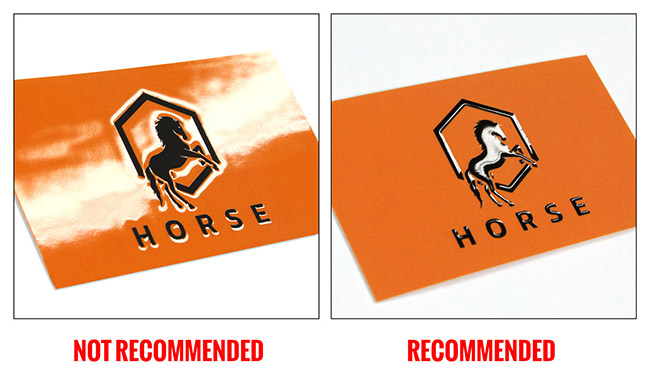
- Akuafoil works best on lighter colors. The darker the CMYK color, the less vibrant the Akuafoil effect.
- Do not use very thin or small text and artwork with Akuafoil. Use San Serif fonts above 12 point for best results.
- If you have Akuafoil applied to a white area, it will have a plain silver Akuafoil look.
- For better quality we recommend creating mask files in vector based programs such as Illustrator or CorelDRAW.
If you would like plain silver Akuafoil to print, make sure to have at least 15% K in the CMYK print file area in order to obtain the highest quality silver Akuafoil effect.
When creating knockouts in the Akuafoil mask or in the CMYK print file, please be aware that there might be a "Halo" of white around the knockout area. Below are two examples: On the left, a file with a CMYK magenta background and a knockout for the Akuafoil text. On the right, an Akuafoil background with a knockout for the CMYK text.
CMYK KNOCKOUT W/AKUAFOIL FILL
CMYK print File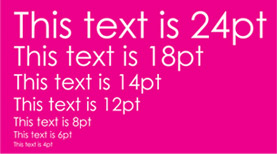
AKUAFOIL KNOCKOUT W/CMYK FILL
CMYK print File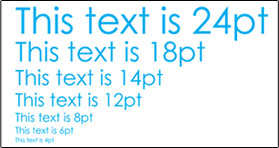
These are the printed results:
CMYK KNOCKOUT W/AKUAFOIL FILL
AKUAFOIL KNOCKOUT W/CMYK FILL
You can see the white "Halo" in-between the CMYK ink and the Akuafoil. To prevent this, grow/stroke the Akuafoil area in the mask by 1 point. This will allow the Akuafoil to bleed into the CMYK area, reducing the white "Halo" effect. You can also fill in the knockout with a color to reduce the effect further.
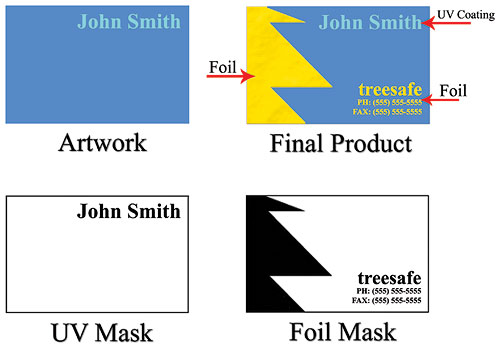
Raised Spot UV jobs are set up the same way as Spot UV jobs. When creating a Raised Spot UV job, you must include a Raised Spot UV mask file along with the regular print file.
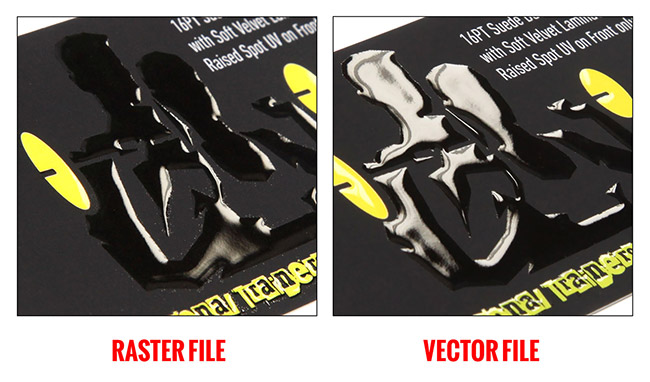
Please note, the mask file must be vector art created in vector-based programs such as Illustrator.
The Raised Spot UV mask file is used to show where the UV coating needs to be applied.
Please only use solid 100% K (C 0%, M 0%, Y 0%, K 100%) to indicate where you would like the UV. Do not use shadows, glows or grayscale images. White will indicate no UV.
Spot UV is a flat finish of a shiny layer that goes on the exact spot where you would like your printed piece to have an area of a high gloss coating.
Raised Spot UV is the same process, except the UV that gets applied stands out from the product, that if you run your fingers over the card you will feel the UV. The depth of the Raised Spot UV is 50 microns.
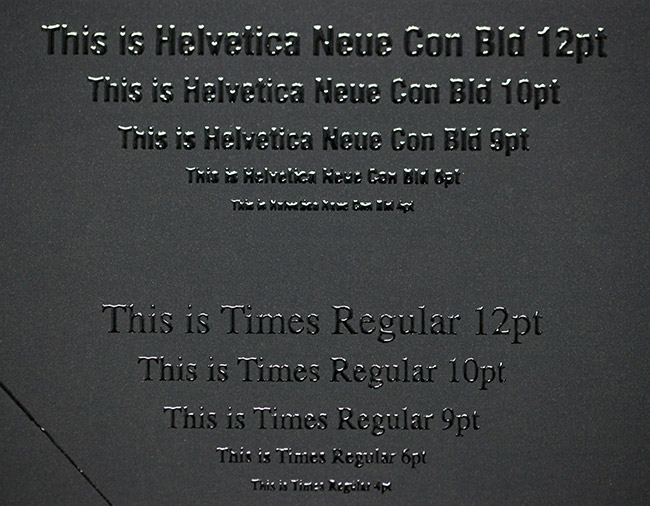
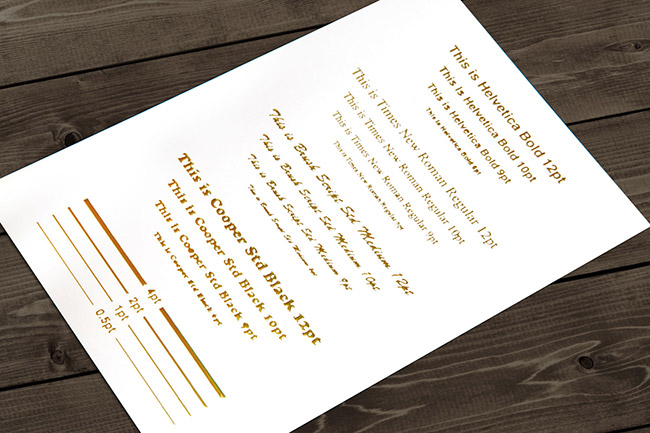
It is recommended that you do not use smaller than 8pt font on the Raised Spot UV Artwork. If however, you use fonts with thicker strokes, it is recommended that you do not use smaller than 10pt font.
When designing a Raised Spot UV greeting card file, please make sure to leave the mask file at least 0.25" away from the scoring line to avoid varnish breakage and allow for easy folding.
For best results, please make sure that UV coverage is less than 30%. Otherwise, the cards will be stuck together and become a block of cards. Also, The mask file must be a vector art created in a vector-based program such as Illustrator. Otherwise, you won't have sharp edges on the artwork.
Up to 70% coverage is acceptable only with patterns, thin strokes or small shapes. Ideally, the size of the area, shape or image covered with raised foil should not exceed 1in x 1in.
Please see the pictures below for reference.
For a Presentation Folder please download our templates, it is important to note that they are printed flat.
The designation of the pockets is based on the flat images so when choosing pockets be mindful of this, please use this image as an example.
Design Like ThisOrder Like This
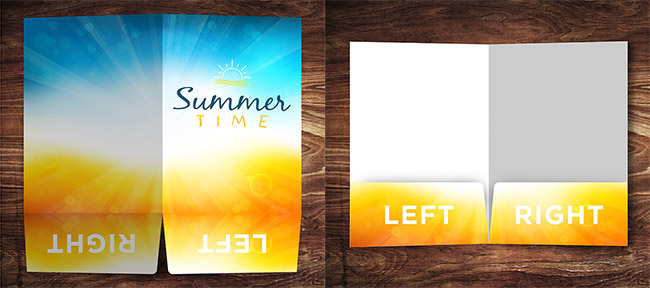
IMPORTANT - Please follow this rule when choosing slits, keep any design, text or logos out of the slit areas. The pocket side you want the slits on should follow the orientation rule above.
Cracking is normal when coated jobs are scored and folded. Ordering the job without UV will help but may not prevent this. As the job is used and folded more and more, cracking will eventually happen. For black Ink or dark designs the higher the ink density, the more likelihood of cracking.
Yes, when selecting 4/4 the uploader will require two files, here is where Front will designate the cover and back cover of the final piece and Back will be considered the inside of the folder.
No, please use our template to design the art but remove and do not include guides for slits, if a template is sent as a layer on the art it will print.
NCR Forms are the modern alternative to carbon paper and are an efficient way to provide multicolored copies of a single document with handwritten or typed information. Use them as order forms, packing lists, invoices, receipts, and more.
They're available in 2 Part (White, Canary) and 3 Part (White, Canary, Pink) collated sets that are glued on the short edge. NCR Forms are printed on 20LB stock on high tech digital equipment.
Yes, NCR forms come collated in 2 Part or 3 Part sets. They come in 2 Part (White, Canary) and 3 Part (White, Canary, Pink) forms and are glued on the short edge.
Our NCR forms can be imprinted on variety of equipment, but we recommend you test your specific application.
NCR Forms are available with full color (CMYK) print on each sheet or as one color, 1/0 (K). We only accept one artwork file which will be printed on all parts of the NCR Form.
The 1/0 means black ink only. Files not submitted as grayscale will be converted to grayscale and the conversion might result in print issues.
NCR Forms are commonly used for order forms, packing lists, invoices, applications and receipts. They are particularly useful when information must be written by hand.
- Full bleed is not available on NCR Forms
- At least 0.25" of space on the glued edge (short edge) should be free of ink
- Full color and solid colored backgrounds are not recommended, as it may effect your ability to read the text and write on the form
- Light ink coverage is highly recommended
Yes. We will email a PDF Proof to the email address on your trade account. The PDF proof will show an example of one NCR Form with numbering. Reply to the email with your approval by mentioning 'Okay to Print As Is' or request a FTP code to upload revised files. Revised files will be processed and a new proof will be sent for your approval.
The default font for the Variable Numbering portion is 14pt Calibri, black ink only. Black ink for the numbering should be taken into consideration when designing your artwork file. If your background images are dark, you may need to KO (knock out) the background image in the numbering areas, so that the numbers are visible.
Note: The CSV data file may contain up to 5 digits or characters for each record.
Artwork file formats: We recommend pdf. You may also send the following types: jpg, jpeg, tif, tiff, eps, and png.
Data file format: We accept csv (comma delimited) format only.
Note: The CSV data file may contain up to 5 digits or characters for each record.
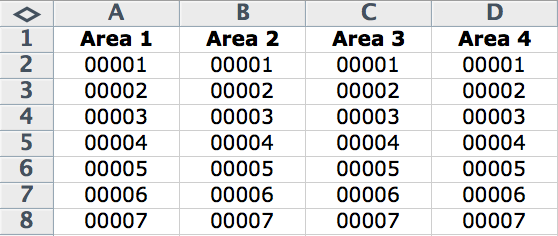
Choose from the 4 numbered areas shown in the example below. You may choose as few or as many areas as you like. Indicate which areas you would like to utilize by naming the Column Headers on your CSV Data File with the corresponding Area Name.
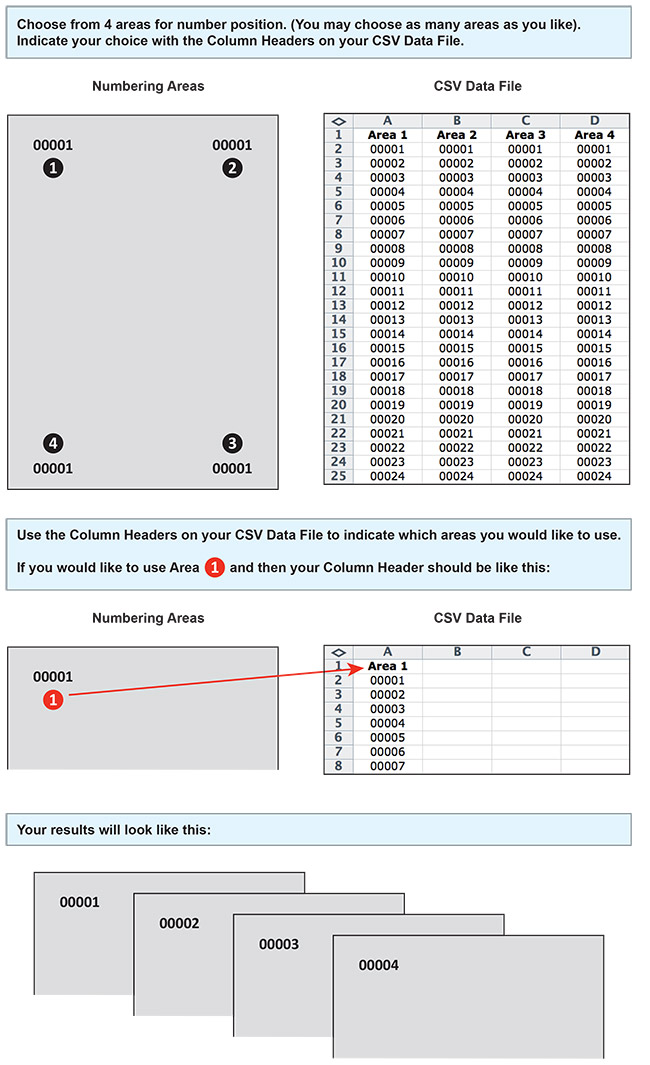
Note: The CSV data file may contain up to 5 digits or characters for each record. See example below.
No, ITMP does not proofread, flag or correct errors. It is your responsibility to double check and ensure the accuracy of your data.
ITMP will print the artwork based on your data file. For example if your run size is 500 and your data file has 450 records, we will only print 450 NCR Forms with Variable Numbering.
ITMP will print the full run size ordered. If your CSV Data File contains more records than the run size ordered, ITMP will not print those additional records.
In order to preserve leading zeroes on your Variable Number CSV file (e.g. 001, 0001) please Format the Cells as Text before creating your numbered list.
To include leading zeros: Right-click (or control click) on the first few cells, then Choose Format Cells > Text or Plain Text. Once your cells are formatted, proceed with creating your numbered list. You should be able to see your numbering correctly before saving your document.
Note: If you close and reopen your document or look at a preview of the document, it will appear that the CSV has reverted and your leading zeroes were deleted. However, be assured that is not the case. As long as you were able to see the leading zeros at the time you saved the document, your CSV has the leading zeros. It is safe to upload your CSV and your leading zeroes will be preserved.
A wrap around cover is a protective cover that is attached to the top back of the NCR form which then wraps around it, coming back up and all the way to the top in the front.
A wrap around cover is inserted under the first set to protect the copies underneath and prevent unwanted transfer.
No, we do not offer printing on the wrap around cover.
The 2 part forms will come as books of 50 quantity.
The 3 part forms will come as books of 35 quantity.
You would need 0.75" on top. Anything within this area will be covered. Use our template to make sure everything prints the way you want.
Clear Window Clings are made of 8mil thick clear glossy material with a paper backer that will be peeled off prior to application. They are suitable for indoor or outdoor use. Ideal for POP signage on glass or other very smooth, clean surfaces. Excessive heat or cold will not allow the product to cling to the surface.
With Clear Window Clings, you have the option to use white ink as an overprint so your printed graphic can be opaque in some areas and transparent in others. This will allow for vibrant, crisp color.
Similar to Spot UV masks, White Mask files are separate from your artwork files and black color indicates where the white ink will print.
Make sure to create your mask file the same size as your color art file. This will prevent alignment issues during printing.
Note: White Masks must be made in vector format and be saved as EPS or PDF and use 100% K.
Use vector paths/shapes to create black color areas that will indicate where the white ink base will go. The rest of the area will represent the Clear Window Cling stock.
Black in the White Mask file indicates where white ink will be printed. Remember the following when creating a white mask for your white ink base:
- White ink base will be printed behind any color that’s in your Artwork Layer.
- Areas with color but without a White Mask will be printed with color directly on the material. These areas will have somewhat transparent color due to the Clear substrate.
- Areas with color and a White Mask will be printed as opaque or solid color.
- Areas with a White Mask and no color will be printed as white.
- The black for the White Mask file must be 0% C 0% M 0% Y 100% K or it will not be recognized by preflight.
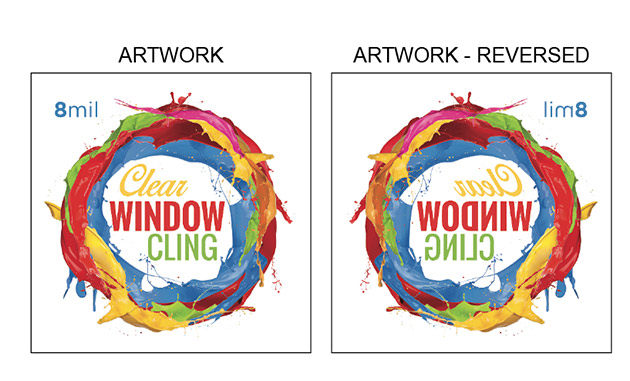
If your Clear Window Cling is intended to be viewed from the outside of a window, please select "Mounted From Inside" when building the product. Also, the artwork should be reversed prior to submission. See images below.
As long as the cling remains clean it can be reused several times. We recommend that you keep the backing to protect the cling if you plan to reuse it.
Start with by thoroughly cleaning and drying the window or application surface. Use a spray bottle filled with soapy water to spray to completely cover the application area. We recommend 1% soap and 99% water. Carefully peel away the backing and avoid letting the cling fold over on itself. Place the side that had the backing against the surface and apply the cling to the window. Use a squeegee or credit card to squeeze out access water pressing from the center outwards. You can spray more soapy water on the back of the graphic to lubricate the surface as you are eliminating air bubbles.
Raised Foil cards are printed on 16pt card stock, laminated on both sides with 1.5mil scuff resistant, soft velvet laminate, which gives them a substantial thickness of 19pt.
Raised Foil jobs require a mask file. When creating a Raised Foil job, you must include a Raised Foil mask file along with the regular print file. The Raised Foil mask file is used to show where the foil needs to be applied.
Please note, the mask file must be a vector file created in vector-based programs such as Illustrator.
Please only use solid 100% black color (C 0%, M 0%, Y 0%, K 100%) to indicate where you would like the foil. Do not use shadows, glows or grayscale images. White will indicate no foil.
Knockouts are not recommended since there may be a shift (up to 1/16”) when the foil is applied.
We highly recommend having a solid color behind the foil mask. We do not recommend having any artwork or text under the foil mask since it might be visible through the foil mask. Knockouts are not recommended since there may be a shift (up to 1/16”) when the foil is applied.
Foil Coverage should be no more than 30% of the artwork, otherwise the foil will be wavy and won’t look good. The only time a 50% coverage is acceptable is with patterns, thin strokes or small shapes. Ideally, the size of the area, shape or image covered with raised foil should not exceed 1in x 1in.
Foil Worx has a flat finish foil whereas Raised Foil has a raised foil finish, that if you run your fingers over the card you will feel the foil. The height of the foil is approximately 60 microns.
We do not recommend having fonts smaller than 10pt on the Raised Foil Artwork. However, if you use fonts with thicker strokes or bold fonts, we do not recommend having fonts smaller than 12pt.
Please see the picture below for reference.
n printing, the term "vector" refers to a type of digital image that is created using mathematical equations rather than pixels. Vector images are made up of paths, each with a start and end point, that are connected by straight or curved lines. These paths can be easily edited and resized without losing quality, unlike raster images (also known as bitmap images), which are made up of pixels and lose quality when resized.
Vector images are commonly used in printing and design for creating logos, illustrations, and typeface. Because vector images are resolution independent, they can be enlarged or reduced without losing quality, making them ideal for printing at various sizes. They are also preferred by printers as they can be easily separated into their individual colors for printing using the CMYK process.
Vector file formats include .ai, .eps, .svg and .pdf which are supported by most graphic design and illustration software.
We recommend saving as a PDF file. You may also send the file in the following types: JPG, JPEG, TIF, TIFF, EPS, and PNG.
We prefer that you send PDF with embedded or outlined fonts. PDF files are easier to handle and will likely speed up your turn-around. Remember to flatten your files before uploading.
For Roll Labels, we recommend designing:
• vector files (e.g. EPS or PDF)
• 300 DPI or higher
• use black (100% K)
• for fine lines and text smaller than 9pt, use black (100% K) only
Bleed must extend past the cut-line and will be trimmed from the product during the final cutting phase. When the image is required to extend all the way to the edge, bleed is needed to preserve the finished look and the quality of the final product.
Please keep all text at least 0.125" inside the cut-line.
- The bleed for Standard Products is 0.125".
- The bleed for Booklets and Presentation Folders is 0.25".
- For Grand4mat Products, please see the G4Mat FAQs for individual substrate guides.
We recommend using our templates at all times.
In The Mix Print requires Print Ready files with proper rotation. Files submitted are printed HEAD to HEAD as-is based off your files.
When using a blue in your design, always make sure to leave at least a 30% difference in your Cyan and Magenta values.
100% C 100% M 0% Y 0% K
ON SCREEN
AFTER PRINTING
Blue is close to purple in the CMYK spectrum. Remember, use a low amount of magenta whenever using high amounts of cyan to avoid purple.
EXAMPLE: C-100 M-70 Y-0 K-0
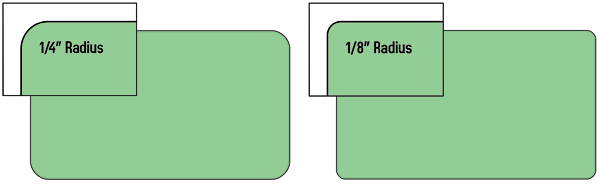
We offer 1/4" and 1/8" radius round corners to all of our customers. The image below shows the two different radiuses for comparison.
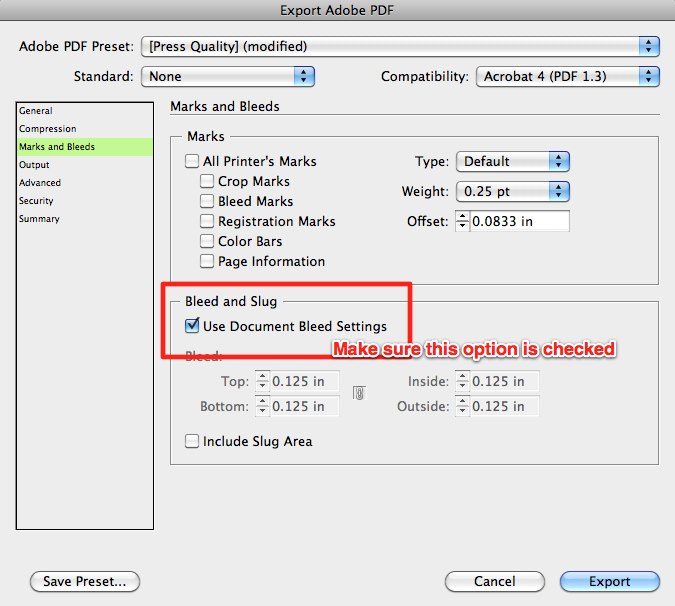
When exporting from any program such as Indesign or Illustrator, use these settings to make sure your .PDF files export correctly.
EXPORT SETTINGS FOR .PDF FILES
Adobe PDF Preset is set to: Press Quality
Compatibility is set to: Acrobat 4 (PDF 1.3)
Compress Text and Line Art is set to: Off
Perfect Binding gives your booklets a more finished, refined look. With this binding method, the pages and cover are glued together at the spine with a strong, yet flexible, thermal glue.
Templates are available for both the cover and inside pages of the Perfect Bound Booklets.
Please note: Unlike our regular Booklets, the page count specified in the product name does not include the cover. E.g. "8.5 x 11, 52-Pages" will require you to upload 48 inside pages + 4-page cover file (which is always 4:0).
There are three different ways Pantone colors can affect the way your job prints.
The first is by object effects, such as shadows or glows, on top of your Pantone colors. Here is what the effects will look like on screen:
Here is what the effect looks like after printing:
As you can see, when a Pantone color is under these object effects, transparency issues show up during printing. To avoid this, convert all your Pantone colors into CMYK before submitting your order.
The second way Pantone colors can affect your file is when you use transparent images. Here is what a transparent image looks like on screen:
Here is what a transparent image looks like after printing:
You can see the image is no longer transparent on top of the Pantone color. These white areas will show up during printing. To fix this issue, convert all your Pantone colors into CMYK. This must be done before submitting the order.
The last way Pantone colors can affect your order is the color conversion between a Pantone color and CMYK. If you use Pantone colors in a job that will print CMYK, your job might print with undesirable colors.
Here are some examples of what the Pantone color looks like in the Pantone color book and what the CMYK print will look like:
If you send in a job with Pantone colors, the CMYK conversion will change the Pantone color. Before sending your order, make sure all Pantone colors have been converted to CMYK.
When designing plastic cards, it is important to keep in mind that the frosted and clear plastic cards are transparent. Also, all plastic cards come with round corners at no extra charge!
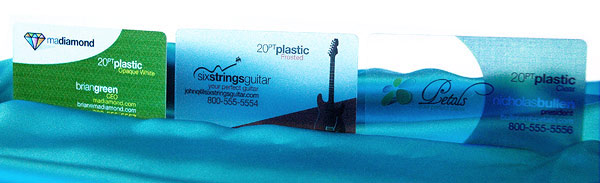
As you can see, the difference in the transparency is shown in the image above. The clear cards (right) are completely transparent. The frosted cards (center) are semi-transparent and cannot be seen through easily. The opaque white plastic cards (left) are solid white and not transparent at all. Keep this in mind when designing your plastic cards, it will affect how your design will print.
- Printing on Clear and Frosted Plastic Cards will come out slightly lighter than average compared to other stocks. This is due to the plastic itself and is not a production issue.
- When setting up a rich black value, please make sure to use C 60 M 40 Y 40 K 100 values. Do not use all 100 since it will cause problems and will not print any darker on plastic.
Since there is no white ink in CMYK, it is important to keep in mind that the frosted and clear plastic cards are transparent. The three designs above are the same as in the first picture. You will notice that the white area in the clear cards (right) and the frosted cards (center) has no ink and will show the transparent material it's printed on. In this case, the clear cards and frosted cards white area show up with no ink on the printed piece. Also, keep in mind that all colors that are printed on clear cards or frosted cards will be transparent as well.
With the clear plastic cards, there might be a small percentage that may have light scratches. This issue originates from the manufacturer and is due to the material and handling. To help compensate for this, we run overs of the clear plastic cards to help meet the required quantity.
Clear plastic cards will come with a thin protective layer on one side that can be peeled off. This is to prevent the cards from scratching during packaging and shipping.
We can only use one type of foil per order so for example you can not order a Foil Worx job with Gold foil on the front and Silver foil on the back. Foil job files are set up just like our Spot UV job files. You must provide a separate Foil mask file: black in the areas you want the foil and white in the areas you do not want the foil. All black areas should be solid 100% K with no other added colors. If you order a Foil Worx job with Spot UV, you'll need to provide separate mask files for the Foil (foil mask) and UV (spot uv mask), in which case you may be required to provide up to 6 files. Please keep in mind, however, that the Foil and UV coating can't overlap, both should be at least 1/16" apart to avoid foil peeling off. Also, avoid using small / fine text or lines for foil objects. For best results, please make sure that foil coverage is less than 50% of the entire print side. Also, be aware that there may be up to a 1/16" shift on the placement of the foil. Keep this in mind if you are trying to align foil with other printed artwork on the card.
For better quality we recommend creating mask files in vector based programs such as Illustrator or CorelDRAW.
Our 14pt Metallic Pearl paper is a unique stock that shimmers in light when viewed from different angles. The stock itself is embedded with Pearl fibers that give the paper an overall smooth, metallic look. Printing on this stock will give your CMYK colors a subtle shimmer, however heavy ink densities or coverage may diminish the effect.
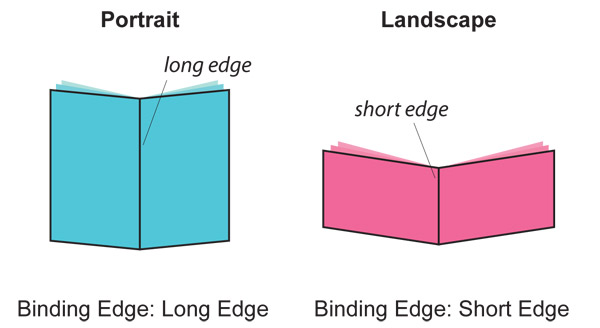
Long Edge Binding means the finished book is portrait, Short Edge binding means the finished book will be landscape. For our short run quantities 25 - 200, only Long Edge binding is available.
Booklets are a little more complex to design. Also, if you have artwork you created from another company, it might not meet ITMP rules. For best results, please download our templates
Here are rules to follow when creating your Booklets:
• Page counts start on the cover as page 1, inside cover as page 2 and so on.
• Total bleed is .25” and total Safety is .5”. For example, an 8.5x11 booklet with bleed should be 8.75x11.25 total. This allows us to set up your crossovers properly.
• Only single pages will be accepted. NO readers OR printers spreads.
• We prefer a multipage PDF but single page files are also ok.
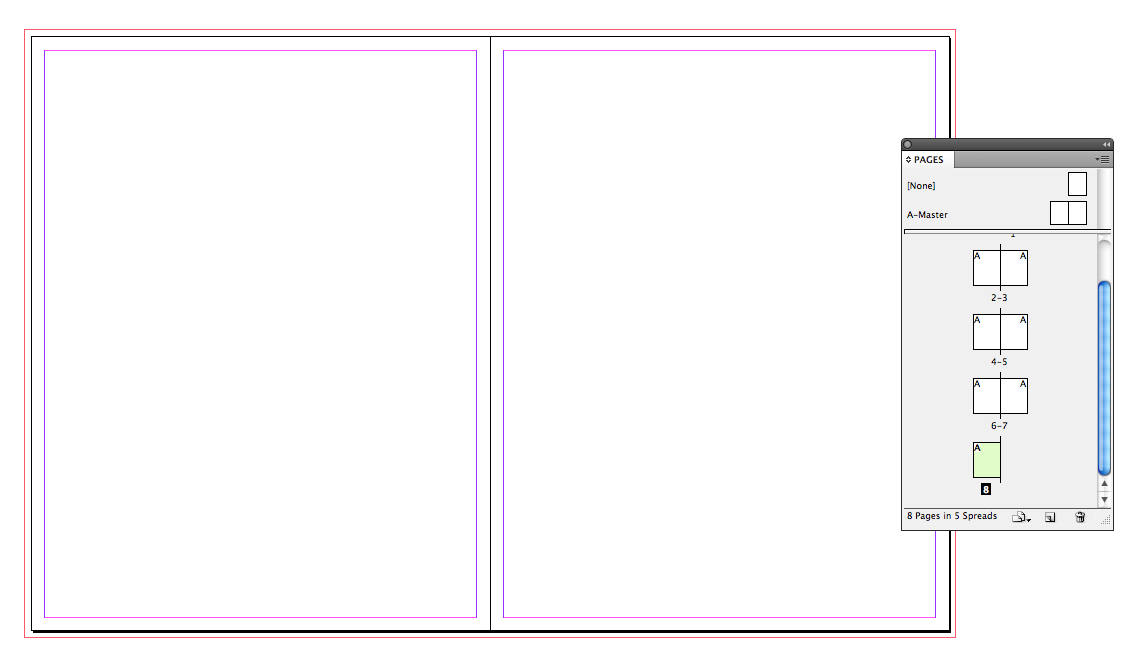
Our page counts for booklets start on the cover as page 1, inside cover as page 2 and so on. In the example below, you will see a 8pg booklet. Each page will show the page number. Click and hold the page corners to turn the page. This is also reflected in our templates.
Crossovers are common in booklets and require extra attention. A Crossover is an image, text or other graphic element that goes from one page to another.
Below you can see a good example of how to create crossovers:
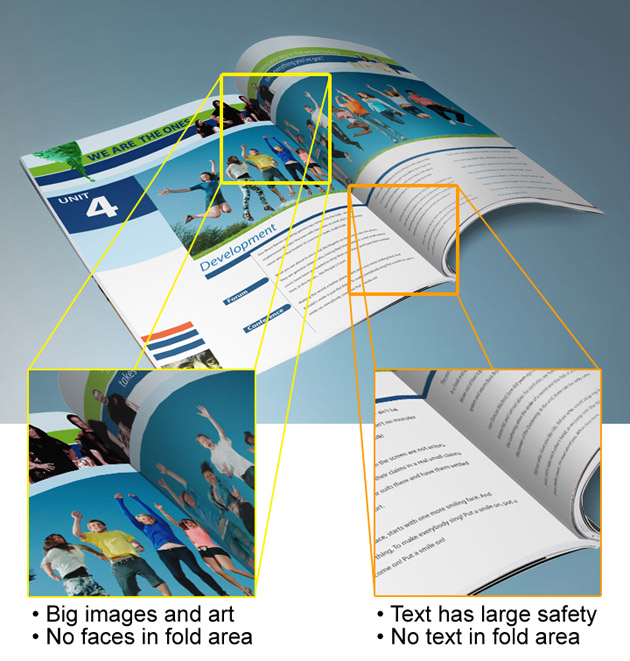
Designers must pay close attention to the crossover design and make sure it is as seamless as possible on the finished piece. Also, do not use text or thin lines as crossovers. Big pictures work best.
Note: Due to the nature of saddle stitch binding, crossovers may not line up 100% on the final booklet.
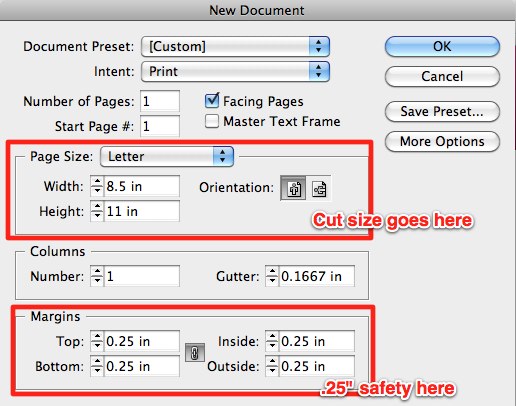
Artwork done in Indesign or other layout software as spreads or facing pages must be saved out as single page pdfs. When creating your design, keep this in mind especially when doing crossovers. The easiest way is to create the bleed is when creating your document. Below are instructions on how to create your document in Indesign.
When creating your document, make your page size the cut size and your margin size .25” for safety for a .5” total:
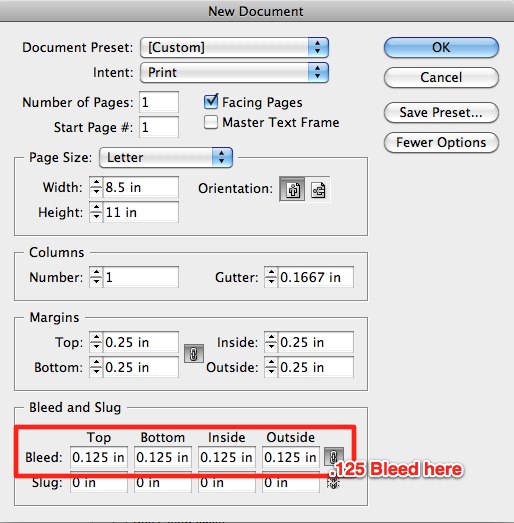
Then, click the More Options button on the right. It will reveal Bleed and Slug settings below. Enter .125” as the bleed for a total of .25”:
Your Indesign document is now ready for proper booklet layout. You should see proper bleed and safety guidelines:
When your ready to export your booklet as PDF, make sure to Use Document Bleed Settings in the Marks and Bleeds menu:
After submitting your booklet, you will receive an email from our online booklet proofing system called Fourte. This system will allow you to double check all the pages and make sure they are in the correct order. There you can approve or decline and re-upload pages if you need to. You will also be able to preview your booklet as if it was printed and bound.
Yes. Landscape booklets are available by choosing Short Edge Binding from the drop-down menu Binding Edge.
ITMP offers two variations of Gift Cards Slits - Slide Slits and Moon Slits. You can choose from positioning the slits on the Inside Bottom Panel or on the Inside Right Panel. See attached illustration for a visual representation. Please be sure to ask for templates.
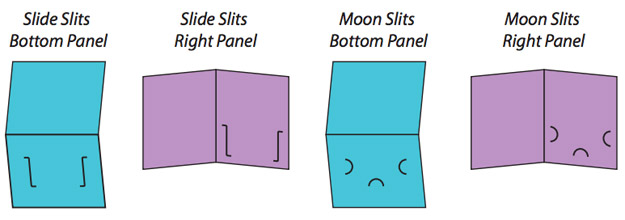
Our Gift Card Holders have optional slits that are sized to fit 2.125" x 3.375" Plastic Cards and Business Cards. Please be sure to test any other application to ensure it will fit into the slits as desired.
While most products are produced in out Production Centers, there are some situations where a Production Center is unable to produce (or does not produce) a certain product. In these cases, the order will by our partners.
We start with 16pt stock as a base and apply 1.5mil soft velvet, scuff resistant laminate to both sides of the sheet for a total thickness of 19pt. The soft velvet lamination adds a soft supple look and feel, which softens colors, reduces contrast and gives an overall lighter, muted appearance.
Suede Cards are water resistant, but not waterproof. This means the cards stand up well when they come in contact with a small amount of water, but cannot be submerged in water without water seeping into the card and causing damage. Please test your specific application to ensure the cards are appropriate for that use.
The term “Suede” refers to the soft, supple texture of the cards, not the actual materials used. A soft velvet laminate is applied to both sides of the card to achieve a luxurious suede-like look and feel.
Steps to create a Multi-Page PDF file:
On a Mac:
1) Open the PDF file that will be on the first page of your multi-page PDF file in Preview.
2) Choose View and click Thumbnails to show page thumbnails in the sidebar.
3) To indicate where to insert your next PDF file, select a page thumbnail.
4) Choose Edit, choose Insert, choose Page from File and click the PDF that you want to add, then click Open.
6) To save, choose File and click on Export as PDF.
On a PC:
1) Open Adobe Acrobat.
2) Choose Tools > Combine Files.
3) Click Combine Files > Add Files to select the files documents to compile.
4) Click, drag, and drop to reorder the files and pages. Double-click on a file to expand and rearrange individual pages. Press the Delete key to remove unwanted content.
5) When you’re done, click Combine Files.
6) Save the new compiled document.
Online Printing System is a prepress process that bridges the gap between online digital content and commercial print production. The process allows a print house, a client or a graphic designer to create, edit, and approve computer-based online templates during the prepress phase. This process increasingly calls for a Portable Document Format (PDF) workflow environment with output provided by digital printing.
Products
The site currently supports eight major and popular print products as listed. We are shortly going to introduce more products like logos/mailing labels, vinyl stickers, catalogs, banners, calendars, door hangers and raised ink cards.
There are three options for designing and customizing a product. Click a product on the left-hand panel and choose one of the options.
1. Custom Design: lets you customize the products. Click it to open the design studio and use multiple tools to create your own design.
2. Upload Design: using this option, you can upload your own JPG, JPEG, GIF, PNG, EPS, AI, PDF and PSD images.
3. Browse Design: use this to select hundreds of pre-loaded templates. Work on them or customize them through our design studio.
The type of paper used for difference purposes is expressed in weight. In the countries following the European system, it is grammes per square metre (gsm or g/m2 or simply g) and in the US system it is Pound (lb).
The paper used for writing/printing (letterheads and such stationery) is generally between 60 to 120 gsm (20 to 70 lb) and is called the paper or text stock. Anything heavier than this is considered the card stock, i.e. the paper used for business cards, postcards, greeting cards, etc.
Coated papers are available in two finishes – glossy (shiny and smooth) and matt (flat and lusterless). Coated glossy papers reflect the light evenly so they are suitable for almost all types of printing jobs. Glossy papers have a good ink holdout, which is important for creating sharp, bright images.
Printing
The Pantone Matching System (PMS) is a color reproduction standard in which colors all across the spectrum are each identified by a unique, independent number. The use of PMS allows us to precisely match colors and maintain color consistency throughout the printing process.
Our system supports RGB (red, green, blue) for producing digital prints. We have accurately mapped color pallet to match RGB to CMYK (cyan, magenta, yellow, key) to ensure proper 4-color printing.
Resolution should be set to 300 dpi.
Pictures and graphics pulled from the internet are often low resolution, typically 72 dpi or 96 dpi. Avoid these graphics, as they will appear pixilated and blocky when printed.
Also note that you should save all photos in CMYK mode, not RGB mode when possible. Images saved in RGB mode may not print properly.
We use offset printing, which provides the highest quality of print material for both text and images.
Pricing
No, the price list indicates basic prices of products against the speculative quantities. The prices are calculated with regard to the most basic paper/card types, sizes and single side printing. As you know, the final printing cost depends on many parameters: paper/card weights or thickness (GSM/Pt), glossy or matt finish, 2 or 4 colors, square or rounded corners, single or double side printing, quantity, destination shipping charges and the mode of transport. Please use the indicative prices for calculating the basic cost. Once you place the order using the above parameters, we will quickly mail you the final, exact cost.